Centroid Products 12" 240-33 Ohm Fuel Level Sending Unit Measures Fuel Level Without Moving Parts
This sending unit is out of stock. We do NOT know if or when we'll see more. Please take a look at the sending units that we sell from Autometer, Fuel Safe, Harmon Racing, ISSPRO or Jaz Products.

Estimate Shipping
Price: $124.99
Call us for availability BEFORE you order this item! We may be low or out of stock on it.
Sold As:
1 Fuel Level Sending Unit
Part Number: KTKSU01224033
MFG Number:
CGFP-12-12V-240/33
OUT OF STOCK
 California Prop 65 Warning: This item may cause cancer or reproductive harm. For more info visit p65warnings.ca.gov The above image is a representation of this item. Actual item may vary. If it's crucial to what you're working on, call the store at 951-737-RACE, and one of our sales reps will be happy to email you a current photograph.
 Product Information:

Do not use this sending unit with E85. E85 conducts too well for Centroid senders. The reading will go to full in about 1 inch and then drop to empty when the fuel is higher than that.
Centroid Product's fuel senders can be cut to length and recalibrated. Designed for oil, diesel, or gasoline (up to 10% ethanol only).
How the sender measures fuel level:
These senders work by measuring capacitance without moving parts. Electronics in the head convert this measured capacitance to the programmed output of Ohms or volts. In fuel senders, capacitance is measured between the inner sensing tube and the grounded outer tube.

Shortening the sender: (only if required)
The fuel sender's outer aluminum tube can be shortened using a tubing cutter, and the inner tube snipped.
Connections:
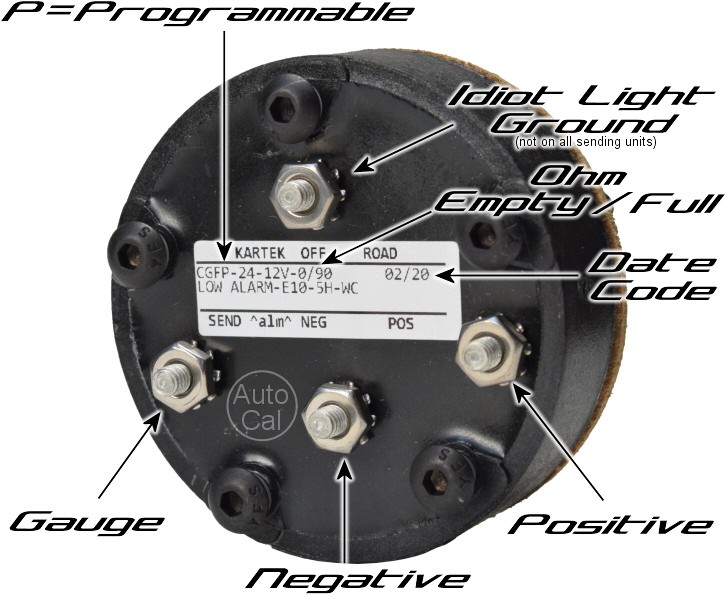
- NEG: Connect this to DC ground. These senders only work with negative-ground systems.
- SEND: Connect this to your gauge or display. Note that this is an electronic output which will confuse your Ohm meter if you try to take a resistance reading. Instead, troubleshoot by voltages, while connected to the gauge.
- POS: The senders have an ignition voltage POS terminal to run their electronics. A fused voltage between 11-28 VDC should be wired to the POS connection. The voltage should turn off when the vehicle is turned off, both for safety and to avoid running down the battery.
- ALM (not on all sending units): The ALARM output switches to ground to turn on an idiot light. A DC load which requires 0.3A or less can be connected to this output, with the far side of the load connected to ignition voltage.
Calibration
The output range, for example 0 Ohms empty and 90 Ohms full, and idiot light low fuel level are set at the factory. They cannot be changed by the end user. If you did not shorten the sender, the factory empty and full settings will be correct! ONLY if you shorten the sender, then calibrate using the steps below. DON'T calibrate fuel senders in water!
-
Auto Calibration: If the sender has Auto Cal stamped on the head
- EMPTY: After shortening the sender, connect the empty sender to the system wiring, and turn on the power. The gauge needle should bounce between empty and full a couple of times and return to empty as the sender discovers its shorter length.
- FULL: Turn OFF the power and install the sender into a full fuel cell. DON'T calibrate fuel senders in water! Turn ON the power. The reading should go above full and then finish on full. This Auto Cal full will use full detection at each fill up.
- EMPTY: 1) Have the sender out of the fuel cell and wired normally to the gauge, with the ignition switch OFF; 2) Have the jumper applied; 3) Have someone turn the ignition switch ON and count the empty seconds listed above, at which point you remove the jumper 4) The reading should bounce several times between empty and full over about 5 seconds before finishing on empty.
- FULL: For fuel senders with 1/2" tubing, full is set automatically by the full detection sensor at power up each time the tank has been filled. This is useful because it corrects for "dielectric constant" differences between tank-fulls of fuel. If for some reason that you find that you need a non-automatic full: 1) Have the sender in a full fuel cell and wired normally to the gauge, with the ignition switch OFF; 2) Have the jumper applied; 3) Have someone turn the ignition switch ON and count the full seconds listed above, at which point you remove the jumper; 4) The reading should bounce several times between empty and full over about 5 seconds before finishing on full.
Manual Calibration: If the sender DOES NOT have Auto Cal stamped on the head. Normally, manual calibration is done via jumpering or bridging Send to Neg and turning on power. Except for the 240/33 Ohm senders without Pos connection. Calibration is done with a 33 Ohm resistor.
Timing: For label dates 4/13 and later: E=10sec, F=20sec. For label dates 3/13 and earlier: E=2sec, F=6sec.
Note: 5 bolt fuel gauge sending units are intentionally asymmetrical. Meaning the spacing between each of the 5 bolt holes isn’t even. Keep spinning the sending unit around and eventually the holes will line up with your fuel cell.
Related Parts
Autometer 4716 Carbon Fiber 2-1/16" Electrical 240-33 Ohm Short Sweep Fuel Level Gauge
In Stock
Price: $103.20
Autometer 4316 Ultra-Lite 2-1/16" Electrical 240-33 Ohm Short Sweep Fuel Level Gauge
In Stock
Price: $89.21
Autometer 5716 Phantom 2-1/16" Electrical 240-33 Ohm Short Sweep Fuel Level Gauge
In Stock
Price: $85.79


